The Baby Tails Makeover
Written by John W. Johnston
Special Thanx to Eric Goodwin, Orwin Raccoon, and Ablater for their
assistance and contributions.
LevelSelect MIDI, rendered by Sega, edited by myself, and courtesy of Sonic HQ.
Legalities: I personally do not have any problem with you
distributing the enclosed information. I do appoligize for the quality
of the drawings, but I only had access to a 16-color MS Paintbrush
system. All of the photos were taken with a Sony Mavica camera. Besides,
they're just there to help you get the general idea. Finished results
will vary from mine - this is not an exact science. If you want to contact
me, there is a "Mail-To" link below. (Flame Mail will automatically be
rejected.) Miles "Tails" Prower, Sonic the Hedgehog, and all related
materials are copyrights of SEGA of America; DiC, Inc; and CalToy, a
division of C&H Toy of America. All rights reserved.
How did Tails look as a baby? There were two episodes of the
Adventures of Sonic the Hedgehog cartoon that answered this question.
One episode was "Tails' New Home" (which is available on VHS -
"Robotnik Express"). Robotnik planned to capture, and then use, Tails to
make Sonic do his bidding. When Tails accidentally got hurt by Scratch
and Grounder, Sonic decides to find him a new home. When Scratch and
Grounder finds them, they inform Robotnik, and them he decides to build
two robot duplicants of Tails' birth parents. Sonic and Tails finds the
new "home," and Tails stays with his "parents."
After a while, Sonic recalls how he met Tails. Sonic was running
like usual, when he decided to stop under a tree. Suddenly, without
warning, someone fell on top of Sonic's head. It was a baby fox was was
trying to find a family. The fox appoligized to Sonic and then explained
how he was rejected by a family of birds. Sonic asked why he would want
to live with the birds, since he doesn't fly. The baby told Sonic that he
could fly - so perhaps he was a bug. Sonic told the baby that he was a
fox, and foxes don't fly. The baby started flying circles around Sonic, and
then Sonic took quick note the baby had two tails. When he was done, Sonic
caught him in his arms.
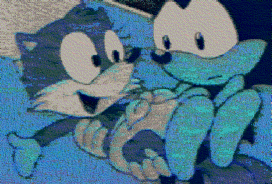
Example 1.Gif
Screen Grab Courtesy of Orwin Raccoon,
With Assistance from Eric Goodwin.
The baby asked Sonic if he could join him. Sonic asked, in
return, if the baby had someone he could stay with. He didn't; he was
lost for a long time and needed someone to take care of him. Sonic
didn't want to be slowed down by taking care of him, so he took off.
The baby started to cry so much, Sonic slipped on the baby's "Trail of
Tears" and ran into a tree. The baby grabbed Sonic by his tail and
airlifted him. Sonic then agreed to let the baby go with him. The baby
was so overjoyed about getting a new big brother, he forgot he was holding
Sonic with his mouth, and dropped Sonic on the ground.
Afterwards, the baby airlifted Sonic in a make-shift stretcher.
Sonic asked the baby his name, and he replied, "Promise not to tell
anyone? It's Miles...I hate it." Sonic then desided to give Miles a
nickname, "Tails." "Tails" was so overjoyed; he knows he's not a bird or
bug, he has a new big brother, and he has a new name.
The second episode was called, "You Must Have Been a Beautiful
Baby." Robotnik built a ray gun designed to turn Sonic into a very old
man [so old, he wouldn't be able to run the 50 yard dash in 3 days ;-)].
However, since Scratch and Grounder had the ray gun in reverse, they
turned Sonic into a toddler, and Tails into a baby. Later, Scratch and
Grounder accidentally turned Robotnik into a very large toddler, who
gives new meaning to the phrase, "Terrible Twos." ;-)
Anyway, if you saw these episodes, you know how cute Tails looked
as a baby. However, if you have a CalToy Tails plush doll and are wondering,
"How could I put a diaper on him," here is your answer. In this file,
there are detailed step-by-step instructions on how to accomplish this.
Here is what you need and what to do.
You will need the following materials - a yard of cloth, thread
that is an identical color to the cloth, scissors, straight pins, a
sewing needle, a sewing machine (optional), and last, but certainly not
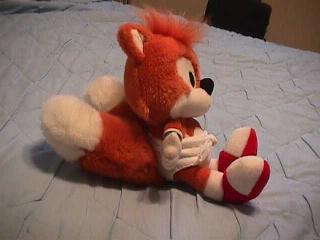
least, a CalToy 11" Tails plush doll. The cloth would need to feel soft
and comfortable; because if this were for the "real" Tails, he would want
to wear something that feels soft and comfortable. I have used a cloth
called Grand Flannel, which is used for making children's sleepware. It
is made of 100% polyester, flame resistant, reasonably inexpensive
(aprox. \\$2 a yard), and feels very soft. To wash, use machine wash warm,
tumble dry warm, and remove promptly. If you use another color besides
white, do not bleach.
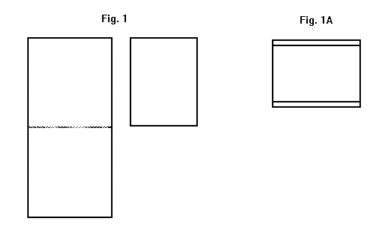
Step One - Cut out a rectangular section of cloth, measuring
aprox. 17" X 10 1/2". Then fold the cloth in half (fuzzy side out) to get
a rectangle measuring aprox. 8 1/2" X 10 1/2". {See Fig. 1} Next, make a
double fold on the top and bottom ends of the cloth. Each fold should
measure aprox. 3/4" to 7/8", and the overall size of the cloth should be
aprox. 7 1/2" X 8 1/2". Sew in the center of the fold to secure each fold.
{See Fig. 1A} [Reader's Note - use straight pins to hold the folds while you
are sewing them.] Cut a piece of fabric measuring aprox. 2" X 18". This will
be used to secure the finished diaper. Place this piece of fabric in a place
where it wont get lost.
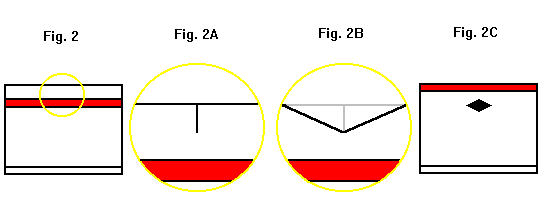
Step Two - Fold the cloth on one end down aprox. 1 3/4" {See Fig.
2}. Find the center of the new fold and make a 1/2" cut. [Be sure there
is aprox. 1/4" between the end of the cut and the first fold (shown in
red)} {See Fig. 2A} Measure 3/4" from both sides of the cut, and make
some marks. Make a cut from each mark to the end of the 1/2" cut. When
done, the cut will resemble a triangle {See Fig. 2B}. Unfold the cloth,
and there should be a diamond shaped hole {See Fig. 2C}.
Step Three - Take Tails and slip his tails (one at a time)
through the hole. The edge of the fold should come up to the bottom of
his armpits, and the ends of the cloth should wrap around a lot of his
belly. {See Fig. 3} Remove the diaper and check the hole. It should be
stretched out to aprox. 2 1/4" wide. Sew around the edge of the hole to
ensure the hole doesn't stretch any further.
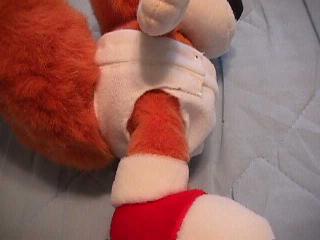
Step Four - Put the diaper back on Tails. Place straight pins at the
ends of the back fold to hold the back part in place. Next, make two folds on
each side of the diaper near his rear, as shown in yellow in Fig. 4, and sew
to secure the folds. This is to give his cute little butt some support.
[Reader's Note - when you secure the folds, make sure there is a little gap
between the edge of the fold you just made and the top fold. This is where you
will put that piece of fabric in later.]
Step Five - Take a pair of scissors and carefully cut the diaper.
First, trim off the excess fabric from the fold you made in Step 4. Place the
scissors flush with the top fold and cut straight down. From the end of
the trimmed area, start cutting around his legs (one at a time). Be sure you
leave aprox. 1/4" between the cut areas and where his leg meets the rest of
his body. Start from the back end and work your way forward. When you get to
his crotch area, cut around the other leg in the same manner. When you return
to the crotch area, fold front of the diaper up to his belly. The front part
should come up to, if not a little higher than, the back fold. Secure the
front flap in place with straight pins and finish trimming.
Begin sewing the trimmed area together, one leg at a time. Start
in the back, where you first cut the excess from the folds. From the
bottom of the folds, continue sewing down the leg. When you start getting
to the areas where you left that 1/4" slack around his legs, fold the slack
inside the diaper, so the edge of the diaper meets the edge of his legs, and
continue sewing. [Reader's Note - if you need to do any additional cutting or
folding, do so at your discretion.]
Step Six - Remove the diaper from Tails and inspect everything
you sewed. Just make sure everything looks ok. Locate the 2" X 18" piece
of fabric. I'll wait a few minutes for you to find it. ;-) Find the
lenghtwise center of the fabric and place it in the back top fold.
[Reader's Note - if you sewed the center of the top fold back in Step 1, you
are ok.] Flip up the fold and place the cloth against the edge. Secure with
straight pins, flip the fold back into place, fold the cloth over the
fold, and sew to secure. [Reader's Note - make sure the fuzzy side of the
cloth is outside. Also, remove each of the straight pins as soon as you
sew past them.] Flip the cloth over top to the other side, pull it as
tight as you can, without creasing the original fold, and sew to secure.
When finished, you will have two long pieces of fabric extending
from the back fold. These will be used to tie the diaper on when you are
finished. Fold the extensions so they look about the same width as the
fold and sew to secure. Next, take the tips of each extension and fold
two corners on the ends to make a point at the end of each extension. Sew
to secure.
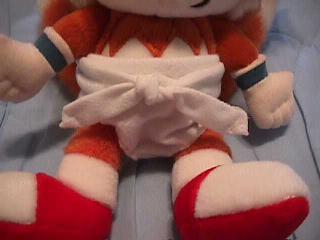
Now, put the diaper back on Tails and make sure everything looks
snug. To put it on properly, first, of course, make sure you have the
right side is out. Put his tails (one at a time) throught the hole in the
back. Bring the front part up to his belly and put the ends of the front
part behind his arms. Take the back fold and line it up with the front
fold. Take the two extensions and tie them into a simple square knot.
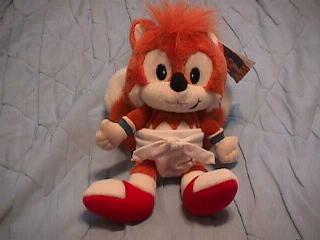
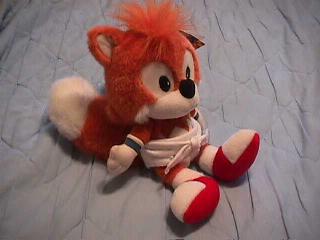
Yipee!!! It's done!
Now, take a really good look at him. AAhhhhh, he just looks so
cute! {Sniff} Hey, wait a minute! {Sniff-Sniff} What's that smell?
{Sniff-Sniff-Sniiiiffff} Uh Oh, 'somebody' needs a diaper change. ;-)
For those who are looking for a Tails plush, try
EBay Online Auction. Please keep in mind, since they're no
longer available in stores, they'll be a bit pricy. The auctions on EBay
average \\$20 (sometimes higher, sometimes lower). Also keep in mind someone
may not be currently auctioning off a Tails plush on EBay, so if you want
to bid on one, check EBay frequently.
Send John W. Johnston
e-mail.
File created 08 December 1995
Last modified 12 October 2002